

1-Check the child’s level of consciousness. We can ask how he or she is doing or gently shake or pat him or her, as long as we are sure that he or she is not suffering from any possible neck or head injury due to an accident. You should observe if it moves or makes any noise.
2-If we get a response. If the child responds by moving or verbally, we should leave the child in the position in which we found him (unless he is exposed to some additional danger), check his condition and ask for help if necessary.
3-If we don’t get a response, ask for help. If the child is unconscious we must ask someone nearby for help. If there is no one around we should not leave the child alone.
4-Place the child face up. We must lie the child on a hard, flat surface, with the head face up and the limbs aligned. It is important to avoid twisting the head and neck, since if the child has suffered an accident he could have cervical injuries.
5-Open the airways. To open the airways, the forehead-chin maneuver will be performed to facilitate the entry of air through the mouth. To prevent the tongue from falling backwards, we must lift the chin with the head fixed and with one hand. At the same time, with the other hand we will tilt the child’s head back, pushing the forehead down with the other hand. In the event of the presence of a visibly and easily removable foreign body in the mouth, an attempt will be made to remove it with the tips of the fingers, but we should never perform a blind sweep of the oral cavity.
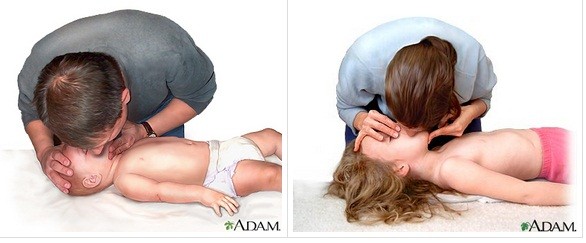
6-Assess and check the child’s breathing. We must put our ear close to the child’s nose and mouth and observe the chest to check if he is breathing. We will observe, listen and feel for no more than 10 seconds before deciding whether the victim is breathing normally. If there is any doubt we will act as if it is NOT normal.

7-If you are breathing, we will place you in the lateral safety position (PLS) whenever possible and we will call the emergency room until the assistance teams arrive, checking your breathing at all times.
In infants, PLS is complicated. We must try to place the infant on a hard surface, even if it is supported, since this will improve the patency of the airway and reduce the risk of choking on vomiting or secretions.
8- If the child is not breathing and we are accompanied by another person, we must tell them to call emergencies (112) . Meanwhile, we will not separate from the child and will begin artificial respiration (mouth-to-mouth). To do this, we will kneel next to the child’s head and follow the following steps:
-Open the airways.
-Cover the child’s nose.
-Take a deep breath.
-Place our lips around the child’s mouth (if the child is under one year old we can cover the mouth and nose at the same time so that it is completely sealed).
-Give 5 uniform rescue insufflations (puffs) until you verify that the child’s chest rises. Remove your mouth to take a breath and observe that the chest drops again. Between each insufflation we must maintain the position of the head and hands, but we must remove the mouth to facilitate breathing.
While rescue insufflations are performed, we must check if they provoke any response in the form of movements, breathing or coughing. If we cannot get air in, we should suspect that some object is obstructing the airways.
9-Check for signs of life. To check for signs of life we must observe signs of coughing, movements and/or breathing.
-If we witness signs of life: continue with mouth-to-mouth ventilation at a rate of 20 per minute until the arrival of assistance services, checking their breathing status and heartbeat at all times.
-If we do NOT witness signs of life: if the child remains unconscious, does not breathe, does not move or has a bad color, these are other signs that his heart is not beating. We’ll start chest compressions.
10-Perform chest compressions. The objective is to compress the chest against the back in a rhythmic way to get blood to leave the heart and circulate through the body. We will place the child face up on a hard surface with the limbs aligned and follow these steps:
-Place the heel of the hand on the sternum, just below the nipples, never at the end of the sternum. In children under 1 year old we will place 2 fingers, and in children over 8 years old we can use both hands.
-Place your other hand so that it holds your forehead slightly tilted back.
-Apply downward pressure on the child’s chest, compressing it between 1/3 and 1/2 of its depth.
-Do 30 compressions, letting the chest rise completely. We must do these compressions quickly, strongly and without pause.
-Then do 2 more insufflations.
-Continue CPR (30 cardiac compressions, followed by 2 insufflations and repeat).

11-Call the emergency room and check for signs of life . If after one minute of starting CPR, we are still alone and have not been able to call the emergency room (112), we must do it now even if we have to momentarily leave the child to do so.
After 2 minutes we must check the effectiveness of our maneuvers: appearance of signs of life and/or spontaneous breathing.
12-Finish CPR. We should continue combining 30 chest compressions with 2 ventilations until:
-get professional help
-the victim regains effective breathing
-we are exhausted
It is important to remember that it is not advisable to perform resuscitation maneuvers with the infant in your arms and while moving. Only in exceptional cases can we mobilize the child in case we move to request help and continue the maneuvers in the other place.